FTP
Using Filezilla
To make a Web page available on an Intranet or the Internet, we need to store them on a Web server. While taking Web classes at Metro, part of turning in your assignment will include uploading it to your student Web site. Your instructor will then access your Web site to grad them. We will be transferring our files to a Web server using the File Transfer Protocol or FTP. To accomplish this, you will need an FTP client application. Filezilla is a free open-source program. The FTP-client is available for multiple platforms such as Windows, Linux and Mac OS X. It can be downloaded from https://filezilla-project.org.
For students taking a Web design course at Metropolitan Community College, a student Web site is created on a Web server administered by the college. Using FTP, you will be able to connect to your student Web site on the Metro Web server and upload and download your Web pages to the server. All files that you create while completing the Learning Activities, Homework Assignments and projects will be stored on your student Web site on the Metro server. Realize that your student Web site is open to the world through the Internet. You are responsible for it's content. Please do not abuse this privilege. Please review the Server Guidelines at this time if you haven't already done so.
All of the student Web sites will be created on our web server located at the URL http://student.mccinfo.net. The site will be created when the student successfully connects the first time using FTP. Your sites will be named using the username that you use to log into the online course or on to a workstation on campus with a tilde character (~) as the first character. Your username is usually your first initial and entire last name and possibly your middle initial and/or followed by a number. To view your Web site in the browser, you would go to the URL http://student.mccinfo.net/~username (replacing username with your actual username). Remember that you won't be able to view your site until you have successfully logged in to it using FTP. The server where your site is hosted is a Linux server. File and folder names are case sensitive on the server. So I recommend that you keep all of your file and folder names in lowercase with no blank spaces.
There will be a folder in your site named public_html. All files that will be viewed through the browser MUST be uploaded to the public_html folder. After connecting to your site in Filezilla, you will want to open the public_html folder on the server by double-clicking it. Once it is open, you are ready to upload files into this folder on the server. To view the files in the public_html folder, you will use the URL http://student.mccinfo.net/~username/. You will NOT include public_html in the URL. Think of the tilde (~) character as representing this folder. The autoload filenames configured on the server are default.htm, default.html, and index.html, in this order. You will still be using default.htm as the autoload filename for the file you want to load in your site.
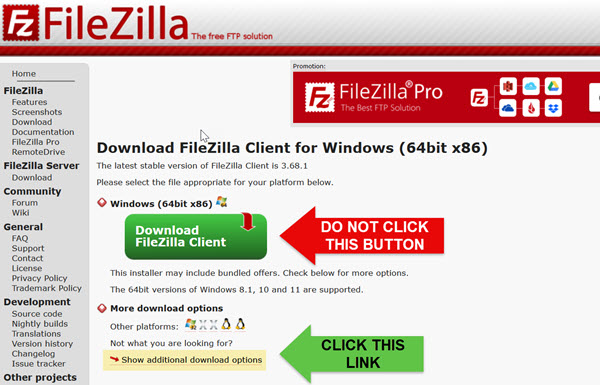
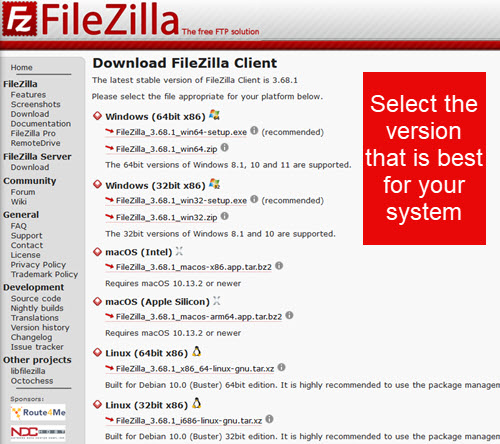
Downloading and Installing Filezilla Client
 |
If you need to download the Filezilla Client program at home, follow these steps:
|

Connecting to Student Web Server
When connecting to your student Web site on the Metro server you will need to use the following information.
FTP Host server: student.mccinfo.net
Login: username
NOTE: Use your MCC username which is the same as the username you use when you log into MCC email and Canvas.
Password: ********
Your password is the same password you use to log on to a MCC email and Canvas.
Port: 7024
You will need to change the port to 7024
Connection: SSH/SFTP
Drop the list of connections down and select SSH/SFTP
*NOTE: If you need to reset your password, visit I.T. Support Services (https://www.mccneb.edu/about-mcc/it-services) and select Password Reset Information.
Using Filezilla
Before connecting the FTP server, you should register it in the Site Manager. Once you register it, you just one click to connect to the same server. To register the FTP server, follow these steps.
Site Manager Setup:
- Open FileZilla
 Click File > Site Manager from FileZilla main window
- Click New Site then name the new connection to what you want (example: lolberding on student)
- Select SFTP-SSH File Transfer Protocol as the Protocol to use
- Enter the ftp address student.mccinfo.net in Host box
- Enter the Port value 7024
- Select Normal from Logon Type box
- Enter your MCC username that you use to log into MCC email
- Enter your MCC password
- Click OK
Connecting
Once the Site Manager has been setup, you can connect a couple ways:
- Click File > Site Manager from FileZilla main window
- Slect the site for your MCC student server on the left
- Click Connect
OR...
- In the Toolbar of FileZilla main window, select the down arrow of most left icon "Open the Site Manager"
- Select your FTP server from drop down list
 If you connect successfully, you should see a list of folders on the remote site which displays on the right. Find the folder named using your username and then open it by double-clicking on it. You can see the other folders on the Remote site, but the only folder you can open is the folder named using your username.
In your folder, you will see the public_html folder. Open the public_html folder by clicking on it.
ALL FILES YOU UPLOAD TO THE SERVER MUST BE UPLOADED INTO THE public_html folder! Before you upload files, make sure you navigate to the public_html folder on your local site on the left and into the public_html folder on the remote site on the right.
You will NOT upload your public_html folder. It already exists on the server. You will only upload the content of your public_html folder into the public_html folder on the server.
Verify that you are in your public_html folder on the local system(on the left) and in the public_html folder on the remote system (on the right) before uploading.
IMPORTANT: All files that will be viewed through the browser must be uploaded to the public_html folder. To view the files in the public_html folder in the browser, you will use the URL http://student.mccinfo.net/~username/. You will NOT include public_html in the URL. The autoload filenames configured on the server are default.htm and index.html, in this order. You will still be using default.htm as the autoload filename for the file you want to load in your site. Also remember that file and folder names are case sensitive.
Filezilla Documentation
There are tutorials and additional documentation available on the Filezilla site at https://wiki.filezilla-project.org/Documentation that will help you get started using Filezilla.
**Revised 6/16/25